3 posts tagged with "community"

View All Tags

· 7 min read
Cem Aksoylar

This blog continues our series of posts where we highlight projects within the ZMK ecosystem that we think are interesting and that the users might benefit from knowing about them.

In this installment, we are highlighting two projects (and a bonus one!) from Joel Spadin, a member of the core ZMK team. The first one is ZMK Tools, a handy Visual Studio Code extension to ease working with ZMK configurations, and the second is ZMK Locale Generator, a tool to help users that use non-US English keyboard locales in their operating systems.

In the rest of the post we leave it to Joel to introduce and explain the motivations of his ZMK-related projects. Stay tuned for future installments in the series!

ZMK Tools

ZMK Tools is an extension for Visual Studio Code that helps with editing a ZMK user config repo or a fork of ZMK. I originally created it to add some code completion in .keymap files, but then I realized that with the web version of VS Code, I could also let you set up a user config repo and build firmware, much like the user setup script, except without downloading a single thing.

User Config Setup in Browser

Here is how you can use ZMK Tools to get started with writing a ZMK keymap entirely within your browser. More detailed instructions can be found on the ZMK Tools README.

  1. Open the ZMK config template repo on GitHub.
  2. Click the Use this template button and follow the instructions to create your own repo.
    • If you don't see this button, make sure you're signed in to GitHub first.
    • You can name the repo anything you want, but "zmk-config" is the conventional name.
  3. From the GitHub page for your new repo, press . (period) and it will re-open the repo in github.dev.
  4. Press Ctrl + P and enter the following to install the ZMK Tools extension:
    ext install spadin.zmk-tools
  5. Press Ctrl + Shift + P and run the ZMK: Add Keyboard command.
  6. Follow the prompts to select a keyboard. ZMK Tools will copy the default keymap for that keyboard if you don't already have one, and it will automatically add it to your build.yaml file so GitHub will build it for you.

You can then edit your .keymap and .conf files. Once you're done:

  1. Click the Source Control tab on the side bar.
  2. Hover over the header for the Changes list and click the + (Stage All Changes) button.
  3. Write a commit message and click Commit & Push to push your changes to GitHub.

GitHub will start building the new firmware. To check the results:

  1. Use your browser's back button to go back to your repo's GitHub page.
  2. Click the Actions tab at the top of the page.
  3. Click the latest build (it should show the commit message you entered earlier). If it's still in progress, wait for it to finish.
  4. If the build was successful, go to the Artifacts section and click firmware to download the firmware. If it failed, check the error and go back to github.dev to fix it.

Keymap Code Completion

ZMK Tools also provides some basic code completion in .keymap files. It will suggest any of ZMK's built-in behaviors inside bindings and sensor-bindings properties, and it will automatically add the necessary headers.

For example, with the cursor at the end of line 6 in the following keymap...

/ {
keymap {
compatible = "zmk,keymap";
default_layer {
bindings = <
&
>;
};
};
};

...it will suggest things such as &kp, &mo, etc., and upon entering one, it will recognize that #include <behaviors.dtsi> is missing and add it to the top of the keymap:

#include <behaviors.dtsi>
/ {
keymap {
compatible = "zmk,keymap";
default_layer {
bindings = <
&kp
>;
};
};
};

Press space after &kp, and it will suggest all of ZMK's key codes. Upon entering one, it will again recognize that #include <dt-bindings/zmk/keys.h> is missing and add it too:

#include <behaviors.dtsi>
#include <dt-bindings/zmk/keys.h>
/ {
keymap {
compatible = "zmk,keymap";
default_layer {
bindings = <
&kp A
>;
};
};
};

This can be very helpful for making sure you spelled key codes correctly and included all the correct headers.

Future Work

Unfortunately, all the code completion info currently comes from a config file baked into the extension, so it won't pick up any custom behaviors or key code aliases you've defined. I'd like to make that work eventually, but it's a much more difficult problem to solve.

ZMK Tools will discover all the boards/shields from both ZMK and your user config repo. With some recent changes in ZMK to allow pulling in features from other Zephyr modules, it's now possible to use board/shields defined in other repos, but ZMK Tools doesn't know about this yet. I'd like to support this too, but making it work in the web version of the extension will be challenging.

ZMK Locale Generator

ZMK's key codes follow the HID specification, and many key codes indicate the position of a key on US keyboard layout, not the key's function. If your operating system is set to a different keyboard locale, then the character each key types won't necessarily line up with the key code name. For example, on a German "QWERTZ" layout, &kp Y will type Z and &kp Z will type Y, so you have to write your layout as if it were QWERTY instead. Other layouts can be even more confusing!

ZMK Locale Generator is another tool I made to help with this. It reads CLDR keyboard layouts and generates #defines to alias key codes to names that make sense in other locales. To use it, first go to the latest release and download the header that matches the locale you use. Next, copy it into the same folder as your keymap and #include it:

#include "keys_de.h"

/ {
...
};

If you open the header file in a text editor, you'll see that it contains many of the standard ZMK key codes, except they are prefixed by the locale code. Depending on the locale, it may also define key codes for special characters specific to that locale, e.g. DE_A_UMLAUT for "ä" and DE_SZ for "ß". If you use these in your keymap, then ZMK will send the correct key codes to type those characters.

#include "keys_de.h"

/ {
keymap {
compatible = "zmk,keymap";
default_layer {
bindings = <
&kp DE_Q &kp DE_W &kp DE_E &kp DE_R &kp DE_T &kp DE_Z ...
>;
};
}
};

I should note that, as a native English speaker and typer, I don't use any of this myself! I just saw that many people were asking for help with this, and I realized I could automate a solution. If you find something that isn't generated correctly, please file an issue or PR a fix on GitHub.

Keyboard Latency Testing

The last project I want to mention is a tool for testing keyboard latency. It requires only a Rasbperry Pi, an optocoupler IC, a resistor, and some wire. If you've ever wondered how ZMK's latency compares to other keyboards, you can check the results here!

I don't have a very large collection of keyboards though, so the data is pretty limited so far. If you want to try it on your own keyboard, see the instructions on the keyboard latency tester README, and please send me a PR with your results!

About Me

I got a degree in electrical engineering but promptly became a software engineer instead. I still like tinkering with electronics though, so I discovered ZMK when I was making wireless macropad with a nice!nano, and I became a regular contributor after that. I use mostly larger keyboards with standard layouts and rarely use anything more complicated than momentary layers, so I've mostly focused on improving core features and tooling.

The keyboards I regularly use are a Ducky One 2 TKL that I leave at work, a Freebird TKL[^1], a custom wireless numpad, and a Yamaha CP4.

[^1] Running QMK, but I have designs to make a wireless PCB for it someday...
· 7 min read
Cem Aksoylar

This blog continues our series of posts where we highlight projects within the ZMK ecosystem that we think are interesting and that the users might benefit from knowing about them. You might be aware that ZMK configurations in the Devicetree format use the C preprocessor so that directives like #define RAISE 2 or #include <behaviors.dtsi> can be used in them. In this installment we are highlighting the zmk-nodefree-config project by urob that contains helper methods that utilizes this fact for users who prefer editing and maintaining their ZMK config directly using the Devicetree syntax format.

In the rest of the post we leave it to urob to introduce and explain the motivations of the project, and various ways it can be used to help maintain ZMK keymaps. Stay tuned for future installments in the series!

Overview

Loosely speaking the nodefree repo -- more on the name later -- is a collection of helper functions that simplify configuring keymap files. Unlike the graphical keymap editor covered in the previous spotlight post, it is aimed at users who edit and maintain directly the source code of their keymap files.

The provided helpers fall into roughly one of three categories:

  1. Helpers that eliminate boilerplate, reduce the complexity of keymaps, and improve readability.
  2. Helpers that improve portability of "position-based" properties such as combos.
  3. Helpers that define international and other unicode characters.

The reminder of this post details each of these three categories.

Eliminating Boilerplate

In ZMK, keymaps are configured using so-called Devicetree files. Devicetree files define a collection of nested nodes, whereas each node in turn specifies a variety of properties through which one can customize the keymap.

For example, the following snippet sets up a mod-morph behavior that sends . ("dot") when pressed by itself and sends : ("colon") when shifted:

/ {
behaviors {
dot_colon: dot_colon_behavior {
compatible = "zmk,behavior-mod-morph";
#binding-cells = <0>;
bindings = <&kp DOT>, <&kp COLON>;
mods = <(MOD_LSFT|MOD_RSFT)>;
};
};
};

Adding this snippet to the keymap will create a new node dot_colon_behavior (nested underneath the behaviors and root / nodes), and assigns it four properties (compatible, #binding-cells, etc). Here, the crucial properties are bindings and mods, which spell out the actual functionality of the new behavior. The rest of the snippet (including the nested node-structure) is boilerplate.

The idea of the nodefree repo is to use C preprocessor macros to improve readability by eliminating as much boilerplate as possible. Besides hiding redundant behavior properties from the user, it also automatically creates and nests all required behavior nodes, making for a "node-free" and less error-prone user experience (hence the name of the repo).

For example, using ZMK_BEHAVIOR, one of the repo's helper functions, the above snippet simplifies to:

ZMK_BEHAVIOR(dot_colon, mod_morph,
bindings = <&kp DOT>, <&kp COLON>;
mods = <(MOD_LSFT|MOD_RSFT)>;
)

For complex keymap files, the gains from eliminating boilerplate can be enormous. To provide a benchmark, consider my personal config, which uses the nodefree repo to create various behaviors, set up combos, and add layers to the keymap. Without the nodefree helpers, the total size of my keymap would have been 41 kB. Using the helper macros, the actual size is instead reduced to a more sane 12 kB.1

Simplifying "Position-based" Behaviors

In ZMK, there are several features that are position-based. As of today, these are combos and positional hold-taps, with behaviors like the "Swapper" and Leader key currently developed by Nick Conway in pull requests also utilizing them.

Configuring these behaviors involves lots of key counting, which can be cumbersome and error-prone, especially on larger keyboards. It also reduces the portability of configuration files across keyboards with different layouts.

To facilitate configuring position-based behaviors, the nodefree repo comes with a community-maintained library of "key-position labels" for a variety of popular layouts. The idea is to provide a standardized naming convention that is consistent across different keyboards. For instance, the labels for a 36-key layout are as follows:

    ╭─────────────────────┬─────────────────────╮
│ LT4 LT3 LT2 LT1 LT0 │ RT0 RT1 RT2 RT3 RT4 │
│ LM4 LM3 LM2 LM1 LM0 │ RM0 RM1 RM2 RM3 RM4 │
│ LB4 LB3 LB2 LB1 LB0 │ RB0 RB1 RB2 RB3 RB4 │
╰───────╮ LH2 LH1 LH0 │ RH0 RH1 RH2 ╭───────╯
╰─────────────┴─────────────╯

The labels are all of the following form:

  • L/R for Left/Right side
  • T/M/B/H for Top/Middle/Bottom and tHumb row.
  • 0/1/2/3/4 for the finger position, counting from the inside to the outside

The library currently contains definitions for 17 physical layouts, ranging from the tiny Osprette to the large-ish Glove80. While some of these layouts contain more keys than others, the idea behind the library is that keys that for all practical purposes are in the "same" location share the same label. That is, the 3 rows containing the alpha keys are always labeled T/M/B with LM1 and RM1 defining the home position of the index fingers. For larger boards, the numbers row is always labeled N. For even larger boards, the function key row and the row below B are labeled C and F (mnemonics for Ceiling and Floor), etc.

Besides sparing the user from counting keys, the library also makes it easy to port an entire, say, combo configuration from one keyboard to the next by simply switching layout headers.

Unicode and International Keycodes

The final category of helpers is targeted at people who wish to type international characters without switching the input language of their operation system. To do so, the repo comes with helper functions that can be used to define Unicode behaviors.

In addition, the repo also ships with a community-maintained library of language-files that define Unicode behaviors for all relevant characters in a given language. For instance, after loading the German language file, one can add &de_ae to the keymap, which will send ä/Ä when pressed or shifted.

About Me

My path to ZMK and programmable keyboards started in the early pandemic, when I built a Katana60 and learned how to touch-type Colemak. Soon after I purchased a Planck, which turned out to be the real gateway drug for me.

Committed to making the best out of the Planck's 48 keys, I have since discovered my love for tinkering with tiny layouts and finding new ways of squeezing out a bit more ergonomics. Along the way, I also made the switch from QMK to ZMK, whose "object-oriented" approach to behaviors I found more appealing for complex keymaps.2

These days I mostly type on a Corne-ish Zen and are waiting for the day when I will finally put together the Hypergolic that's been sitting on my desk for months. My current keymap is designed for 34 keys, making liberal use of combos and timerless homerow mods to make up for a lack of keys.

Footnotes

  1. To compute the impact on file size, I ran pcpp --passthru-unfound-includes on the base.keymap file, comparing two variants. First, I ran the pre-processor on the actual file. Second, I ran it on a version where I commented out all the nodefree headers, preventing any of the helper functions from getting expanded. The difference isolates precisely the size gains from eliminating boilerplate, which in my ZMK config are especially large due to a vast number of behaviors used to add various Unicode characters to my keymap.

  2. I am using the term object-oriented somewhat loosely here. What I mean by that is the differentiation between abstract behavior classes (such as hold-taps) and specific behavior instances that are added to the keymap. Allowing to set up multiple, reusable instances of each behavior has been a huge time-saver compared to QMK's more limited behavior settings that are either global or key-specific.

· 6 min read
Cem Aksoylar
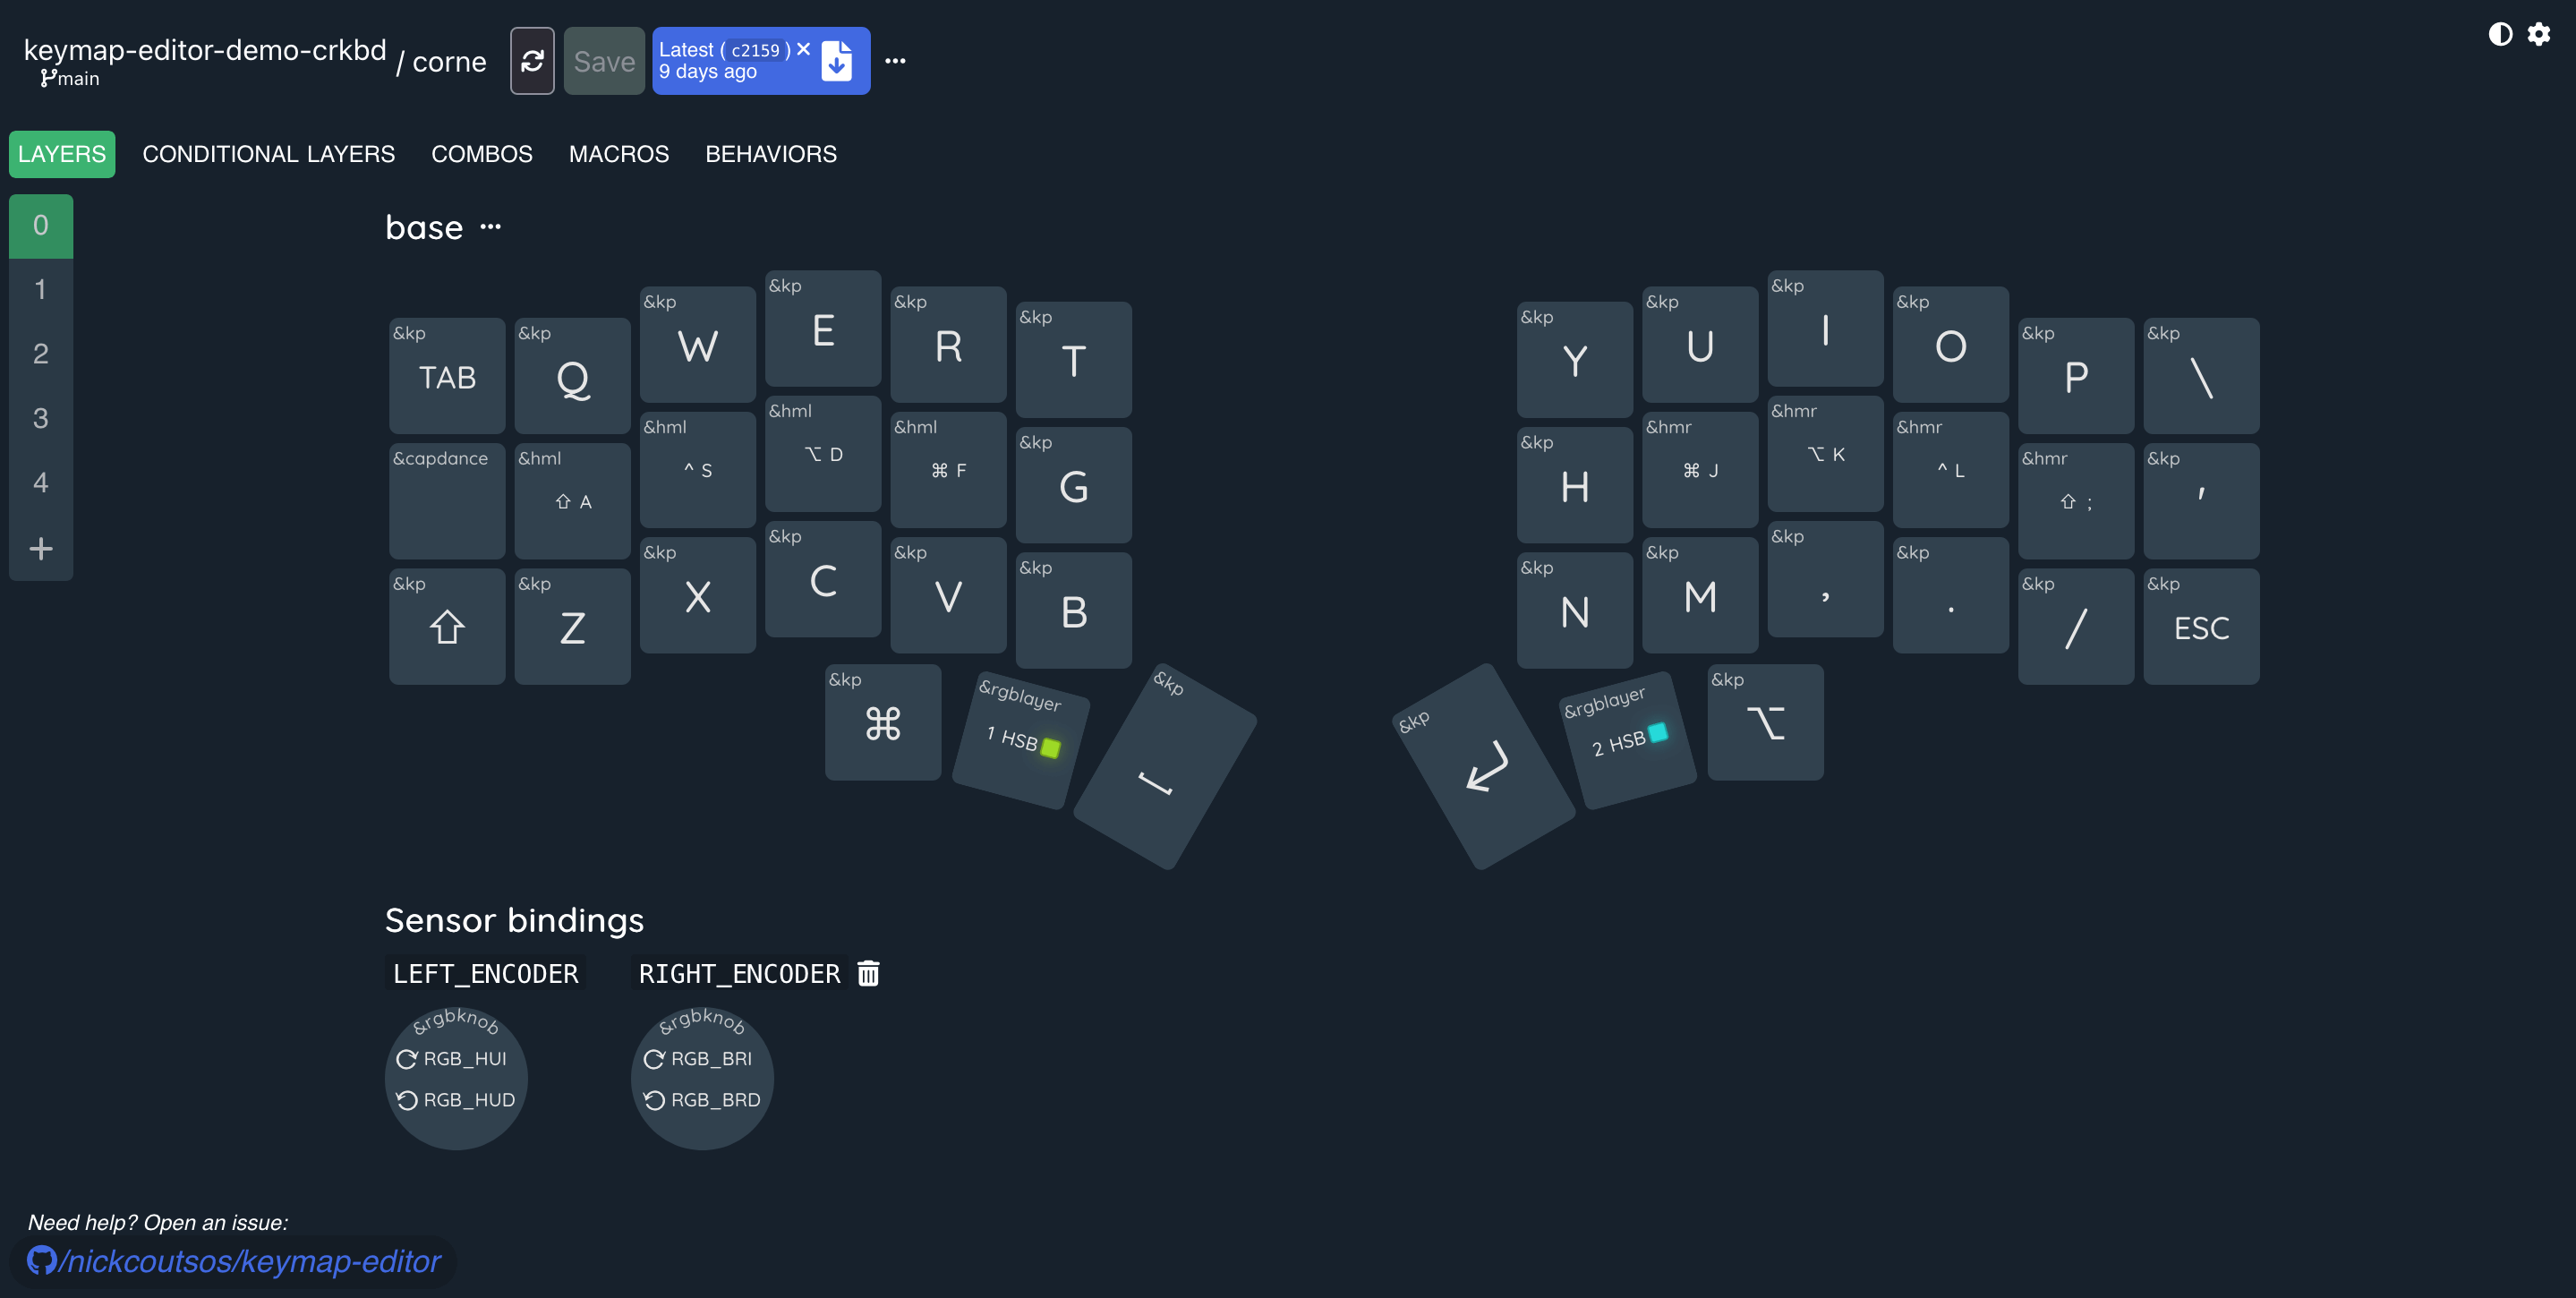
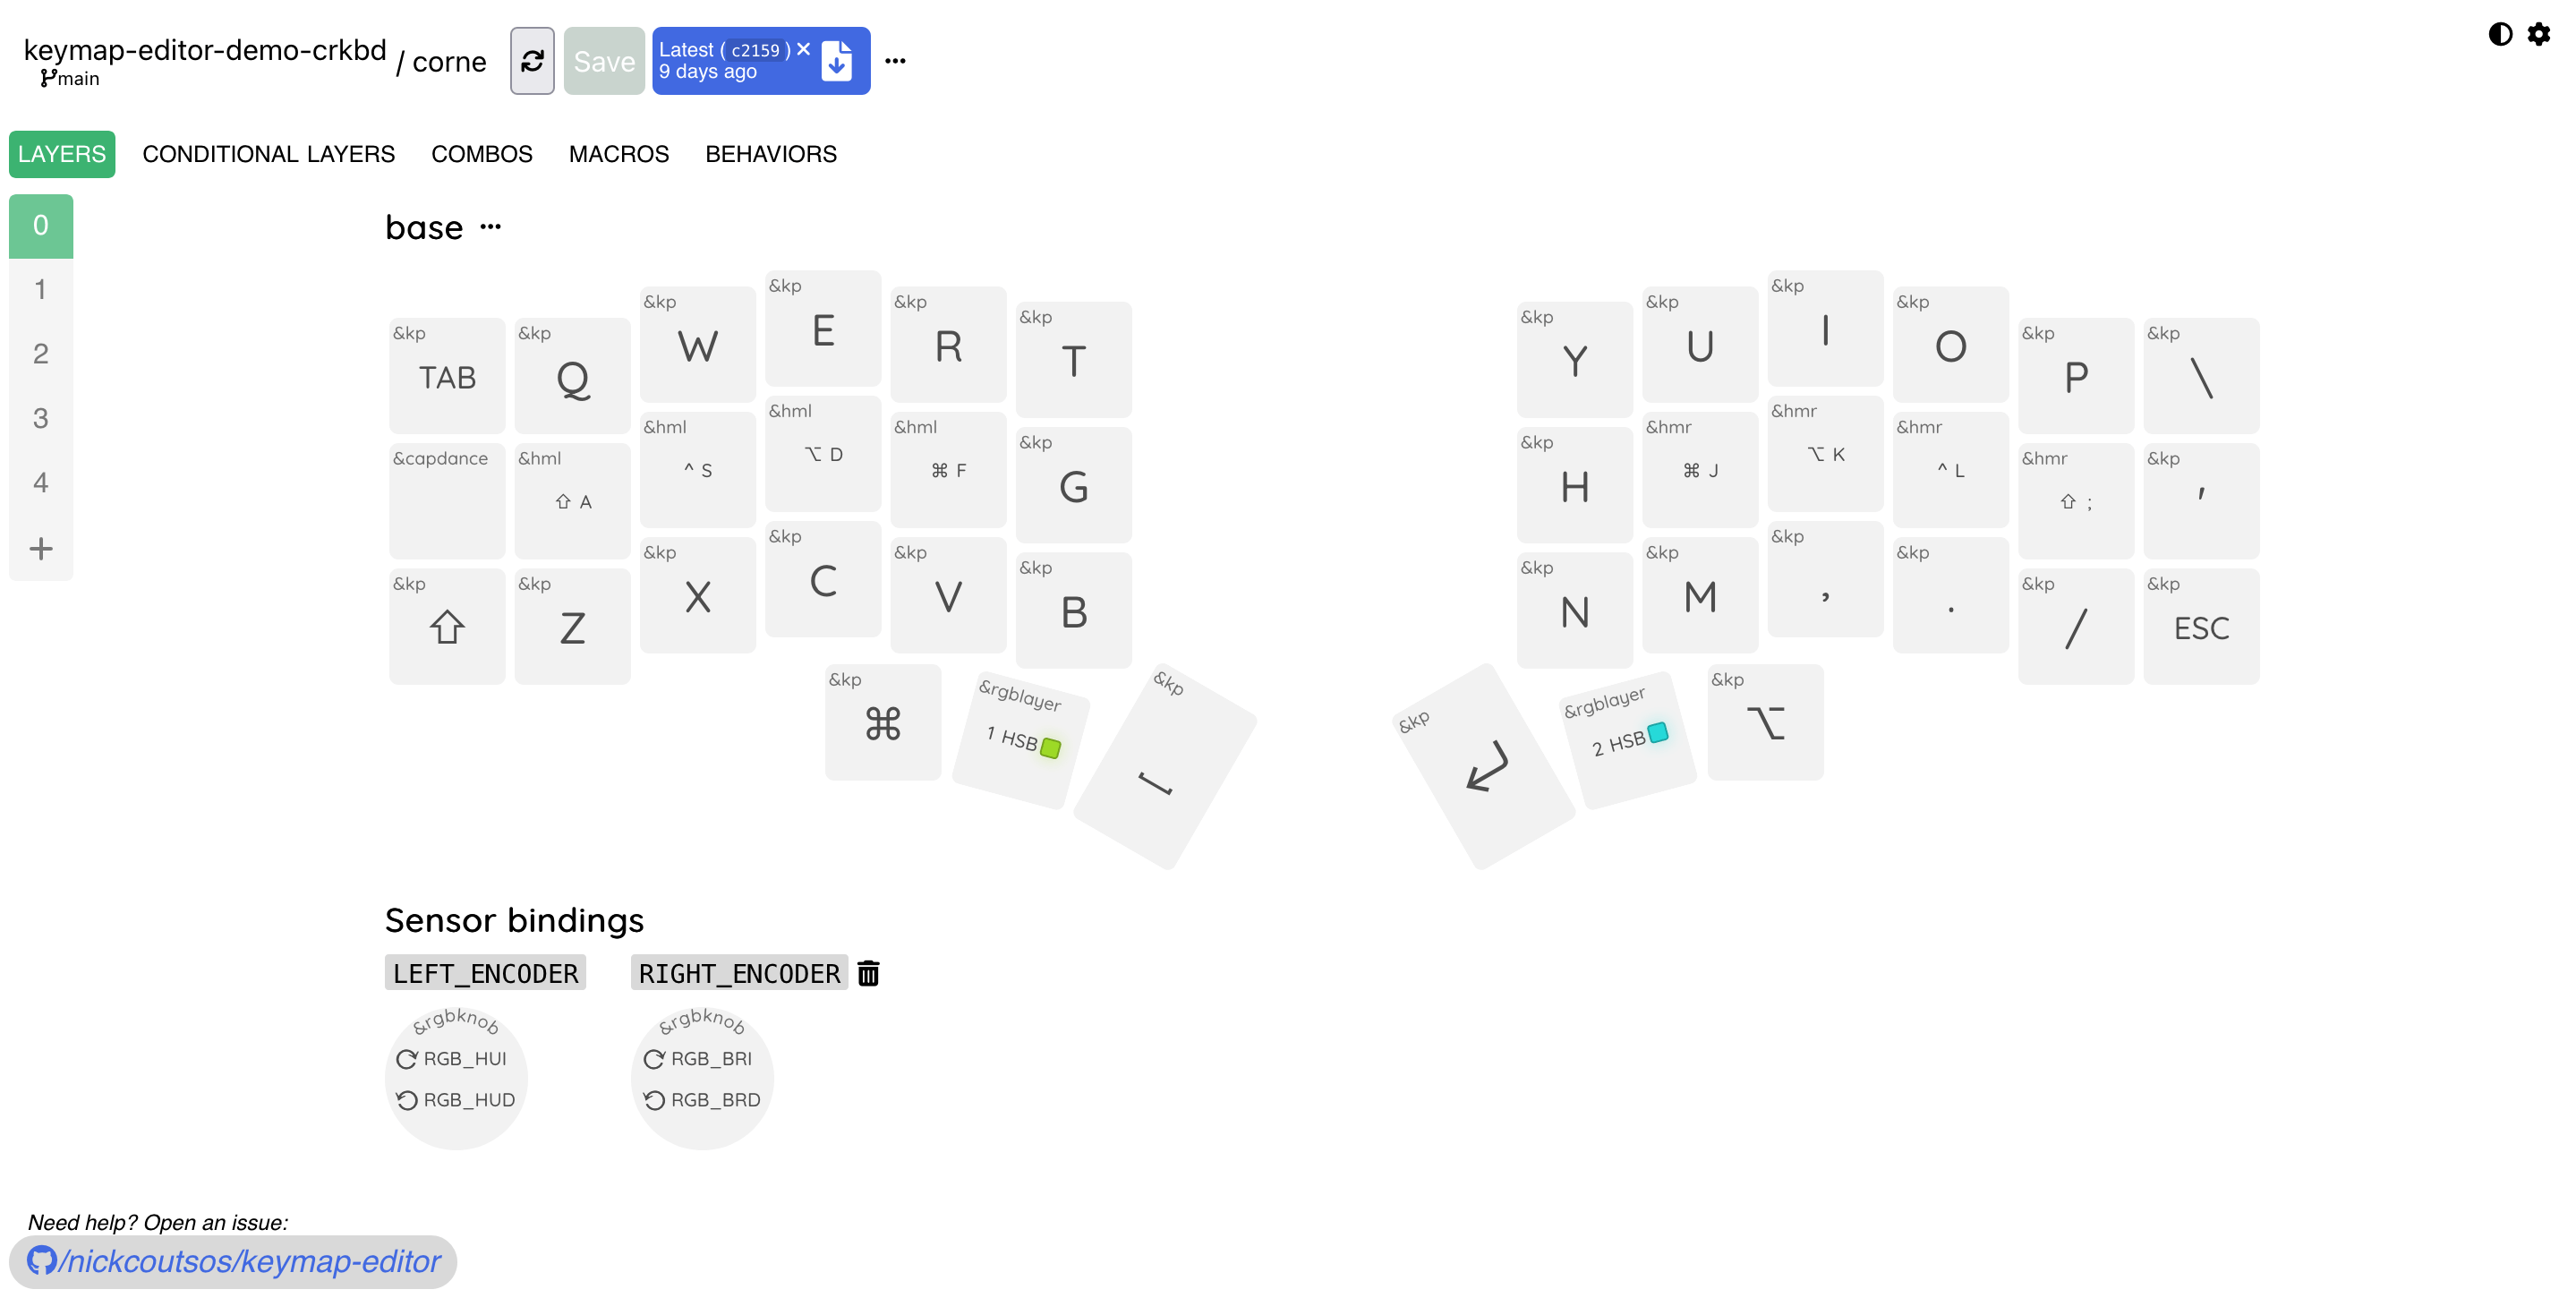
Shows a screenshot of the Keymap Editor application featuring a graphical layout of the Corne Keyboard with a keymap loaded from the nickcoutsos/keymap-editor-demo-crkbd GitHub repository.Shows a screenshot of the Keymap Editor application featuring a graphical layout of the Corne Keyboard with a keymap loaded from the nickcoutsos/keymap-editor-demo-crkbd GitHub repository.

This blog post is the first in a series of posts where we highlight projects within the ZMK ecosystem that we think are cool and that the users might benefit from knowing about them. We are starting the series with a big one, Keymap Editor by Nick Coutsos!

In the rest of the post we leave it to Nick himself to introduce the project, detail his goals and motivation in developing such a tool, and talk about the future of the project. Stay tuned for future installments in the series!

What is Keymap Editor?

Keymap Editor is a web based graphical editor for ZMK keymaps. It provides a visual way to manage the contents of your keymap and if nothing else offers two critical features:

  1. Automatic formatting of the keymap file, so that bindings arrays remain readable
  2. Searchable behaviors, keycodes, commands, etc, so you won't have to remember if it's LCTL or LCTRL (I just had to double check myself and I guessed wrong, apparently)

What can Keymap Editor do?

  • Render devicetree keymaps using pre-defined, auto-generated, or side-loadable keyboard layouts
  • Integrate with a GitHub repo to streamline firmware builds, or FileSystem/Clipboard if you'd still rather build locally
  • Edit combos, behaviors, macros, conditional layers and rotary encoder bindings
  • Manage references: moving a layer or renaming a behavior will look for references throughout your keymap and update them.

But check back regularly, because I update pretty often. A recent significant achievement was enabling parameterized macros and tying it in with my existing parameter type resolution so, yeah, you can finally create that reusable macro combining bluetooth profile selection with RGB backlight colour. Or use it for an actual useful thing, even. (See also: Using Parameterized Macros in Keymap Editor)

My goals are, broadly:

  • Treat code as a first-class entity: as long as ZMK keymaps are described in devicetree code then an editor needs to produce readable devicetree code.
  • Flexibly support ZMK features: use of any ZMK keymap feature should theoretically be achievable within the app. In some cases this can mean more initial setup (See also: my thoughts on implementing "autoshift") but having that foundation makes its easier to add shortcuts and niceties — something I do quite often now.
  • Don't get in the way of not-yet-supported features: If a new ZMK feature is released and the app isn't able to add it natively, you can always edit your keymap file directly. While the app may not recognize the new features, further changes through the app should not break your keymap.

History of Keymap Editor

When I started writing Keymap Editor I had a handwired Dactyl variant running QMK. Manually editing keymap code was fine, but keeping things readable was important to me, and automating that was the best way to ensure consistency. Programmatically modifying source code was beyond me at the time so the first version persisted keymap data in JSON and spat out formatted versions of both the JSON and C keymaps.

After switching to ZMK I added a few more features, I guess as a pandemic project, and then gradually migrated from generating a templated keymap file to manipulating devicetree syntax directly, and that has made a big difference in adding new ZMK features.

Why am I doing this?

It started out as a useful tool for me. I shared it with the ZMK community and gained a little traction, and then apparently quite a bit of traction — turns out it's useful for a lot of people.

I'm a software developer because I enjoy building things. Much of my day-to-day work isn't user facing, so seeing how helpful the keymap editor has been for people in the ZMK community is a big motivator to keep improving it.

Future plans

Runtime updates

Streamlining the keymap update process is probably top of mind for most users, but that involves a really big firmware feature, and I'm the wrong person to tackle it.

That said, once there's a protocol I would absolutely be down to integrate it as an additional keymap source. Being able to pull data directly from the keyboard should unlock a lot of possibilities and ease some of the constraints imposed by using devicetree code as a medium.

Simplifying behavior use

I think a lot of people would like to see the concept of behaviors abstracted away for new users and to prompt them with

  • "When the key is tapped...",
  • "When the key is held...",
  • "When the key is double-tapped..." and so on.

Users who are less familiar with ZMK's behaviors and how they are composed may find these prompts to be more intuitive, and their answers could be mapped to an appropriate combination of behaviors managed internally by an editor.

Uh, what else?

This has been long enough already, if you're looking for a feature I haven't mentioned don't assume I won't add it. Feel free to make feature requests on the GitHub repo, and I'd be happy to discuss it!

About Me And My Keebs

I like computers and write software. Many in this field enjoy using mechanical keyboards for their feel or aesthetics, but what piqued my interest was the Dactyl keyboard. I think, ergonomics aside, I'm more interested in the DIY/maker aspect than the collecting of keyboards and switches.

So I made a Dactyl, and then I made another Dactyl and I made a third Dactyl that isn't interesting enough to photograph, but now I'm using ZMK so I left room for 18650 cells.

That last Dactyl (with MX browns and a cheap blank XDA keycap set) serves me well the eight or so hours a day I'll spend at my desk, but I also spend a good deal of time computing on my couch where I'll use... my Macbook's built-in keyboard.

In case that's not surprising enough I'll leave you with this: despite all of the work and testing I've put into the keymap editor project, I've only updated an actual keymap once in the last year.

Thank you and good night.

More information